News & Events
Essential Steps to Avoid Blotchy Western Blots

Sep

You may feel frustrated when you see a blotchy western blot after hours of work. Blotchy backgrounds can make it hard to trust your results. When this happens, you risk getting inaccurate protein measurements and may notice that loading controls do not match up.
- Variability in loading controls can cause errors in protein quantification.
- If you load too much protein, the results may not show real differences in expression.
- Technical problems, like stripping and reprobing, can make your results less consistent.
Paying close attention to each step can help you avoid these issues and achieve clearer, more reliable protein detection.
Key Takeaways
- Keep your membrane wet at all times to ensure even protein transfer and avoid dry spots.
- Wash your membrane thoroughly after each antibody step to remove unbound antibodies and reduce background noise.
- Choose the right blocking agent to prevent non-specific binding and high background signals.
- Optimize protein loading by measuring concentration to avoid dark, blotchy backgrounds.
- Use clean tools and prepare fresh buffers to prevent contamination and ensure reliable results.
What Is a Blotchy Western Blot?
Definition and Appearance
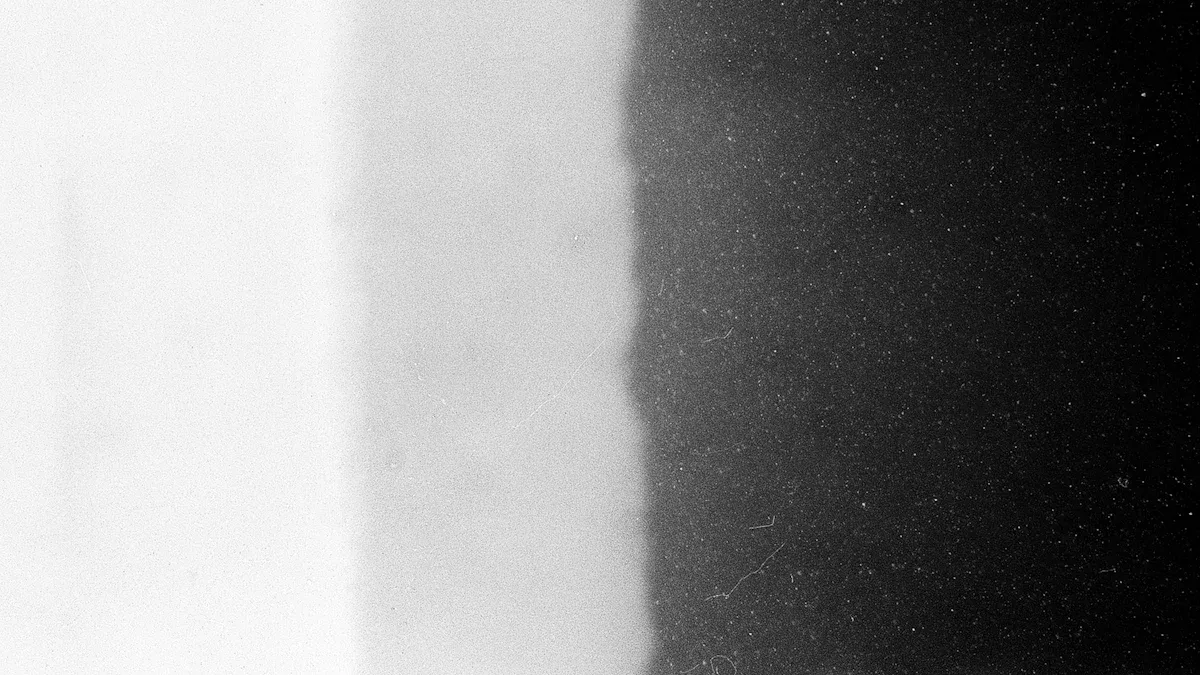
When you run a western blot, you expect to see clear, sharp bands that show where your proteins are. Sometimes, you notice that the blot looks patchy or streaky instead. This is what scientists call a blotchy western blot. You see uneven bands, and the signal intensity changes across the membrane. The blot does not look smooth. Instead, some areas appear darker or lighter than others.
Tip: If you see streaks or patches on your blot, check for uneven band distribution. This can help you spot problems early.
A clean blot shows crisp bands with even backgrounds. You can easily compare protein levels. In contrast, a blotchy western blot makes it hard to see where the bands start and end. The patchy look can confuse you when you try to measure protein amounts.
Why It Matters
You want to trust your results. Blotchy backgrounds can hide protein bands, making it tough to judge their size and strength. You might miss a band or think a band is stronger than it really is. This can lead you to misinterpret protein expression levels. Sometimes, you may underestimate or overestimate how much protein is present.
Blotchy backgrounds often point to problems in your process. You may have washed the membrane too little, or the membrane may have dried out. These issues make your analysis harder and less reliable.
| Problem | Effect on Results |
|---|---|
| Patchy background | Bands are hard to see |
| Streaks | Signal is inconsistent |
| Uneven bands | Quantification is tricky |
If you want accurate data, you need to avoid blotchy western blot results. Paying attention to each step helps you get clear, easy-to-read blots.
Blotchy Western Blot: Common Causes
Dry or Improperly Wetted Membrane
A dry or improperly wetted membrane often causes uneven backgrounds. When the membrane dries out, proteins cannot bind in those areas. You may see white spots or patches where no signal appears. These dry spots prevent even protein transfer and lead to a blotchy western blot.
Tip: Always keep your membrane wet. For nitrocellulose, soak it in transfer buffer before use. For PVDF, first dip it in methanol, then move it to transfer buffer.
- Make sure you wet the membrane thoroughly before starting.
- Do not let the membrane dry out at any point.
- Rehydrate nitrocellulose directly in transfer buffer.
- For PVDF, use methanol first, then transfer buffer.
Insufficient Washing
If you do not wash the membrane enough, leftover antibodies and proteins can stick to the surface. This creates a patchy or streaky background. Some areas may look darker because they hold more unbound antibody.
- Wash the membrane with plenty of buffer (at least 40 ml for a 10 cm² blot).
- Incubate in wash buffer for 5–10 minutes with constant shaking.
- Repeat washing after each antibody incubation.
- Use a shaker to improve washing.
- Prepare fresh wash buffers each time.
- Increase Tween-20 concentration to 0.1% if needed.
- Try longer washing times or more buffer changes for stubborn backgrounds.
High Antibody Concentration
Using too much antibody can cause non-specific binding. This means the antibody sticks to places it should not, making the background blotchy. If you do not block the membrane well, this problem gets worse.
- Block the membrane with enough blocking agent, like non-fat milk or BSA.
- Increase blocking time if you see high background.
- Use the right dilution for your antibodies.
| Antibody Type | Recommended Dilution Range |
|---|---|
| Primary Antibody | Varies greatly, needs optimization |
| Secondary Antibody | 1:5,000 to 1:200,000 |
- Too much antibody increases background noise.
- Too little antibody gives weak signals.
Excess Protein Loading
Loading too much protein on the gel can make the entire lane look dark and uneven. This high concentration causes multiple bands and a strong background signal. The result is a blotchy western blot that is hard to interpret.
- Make sure your loading control stays the same in all samples.
- Choose a loading control and protein of interest that are easy to tell apart.
- Keep both signals within the linear detection range.
-
Use the same amount of protein in each lane.
-
If you see streaks, try loading less protein.
-
The Proteintech lab suggests 30 μg of protein per lane for best results.
-
Use gels with uniform makeup.
-
Pick the right acrylamide percentage.
-
Avoid running gels at high voltage.
Improper Transfer Conditions
If you do not transfer proteins correctly, you may see uneven bands and backgrounds. Poor transfer can leave some proteins behind or move them unevenly. This leads to blotchy bands and makes it hard to compare samples.
- Check your gel quality before transfer.
- Make sure you load samples evenly.
- Block the membrane well to prevent non-specific binding.
- Wash the membrane after transfer to remove leftover antibodies.
Air Bubbles During Transfer
Air bubbles trapped between the gel and membrane block protein movement. These bubbles cause uneven contact, so proteins do not transfer in those spots. You will see dark or light patches where bubbles were present.
Tip: Carefully assemble the transfer sandwich. Use a roller or glass rod to remove air bubbles. Keep the membrane wet and the buffer at the right temperature.
- Roll out bubbles before starting the transfer.
- Hydrate the membrane well.
- Keep the buffer cool to prevent overheating.
Inadequate Transfer Time or Buffer
If you do not transfer proteins long enough, or if you use the wrong buffer, proteins may not move onto the membrane evenly. This can cause weak or uneven signals and high background noise.
| Issue | Explanation |
|---|---|
| Inadequate transfer time | May lead to incomplete transfer of proteins, resulting in weak or uneven signals. |
| Incorrect buffer composition | Can hinder the transfer process, causing variations in protein binding and high background noise. |
| Insufficient buffer | Can lead to uneven bands due to inadequate conditions during the running process. |
- Use the right buffer for blocking and antibody steps, such as 1X TBS/0.1% Tween-20/5% nonfat dry milk.
- Check the recommended buffer for your specific antibody.
Membrane Contamination
Contaminants on the membrane can cause blotches, speckles, or smears. Dirty forceps, containers, or bacterial growth all leave marks that show up during detection.
| Contamination Source | Appearance | Solution |
|---|---|---|
| Dirty Forceps | Blotches in 488/520/700/800 nm channels where forceps have touched the membrane. | Use clean forceps, wash with detergent, rinse with water, and a final rinse with methanol. |
| Dirty Processing Containers | Dark, smeared signal or speckles in the 700 nm channel due to Coomassie stain or gel stain residue. | Use different containers for gel staining and Western blot detection. |
| Bacterial Growth | Speckles and blotches in 488/520/700/800 nm channels. | Wash containers with detergent, rinse thoroughly with distilled water, and a final rinse with methanol. |
| Acrylamide Residue | Speckles and blotches in 700/800 nm channels. | Wash containers with detergent, rinse thoroughly with distilled water, and a final rinse with methanol. |
| Secondary Antibody Aggregation | Speckles and blotches in 488/520/700/800 nm channels. | Centrifuge secondary antibody before use and filter it. |
- Always use clean tools and containers.
- Wash everything with detergent, rinse with water, and finish with methanol.
Cross-Reactivity with Blocking Agents
Blocking agents help cover open spots on the membrane. If you choose the wrong one, it can react with your antibodies and cause non-specific binding. This leads to a blotchy western blot with high background.
| Blocking Agent | Cross-Reactivity Risk | Background Noise Risk | Notes |
|---|---|---|---|
| Non-fat Milk | High | High | Contains casein, binds to anti-phospho antibodies, may mask low abundance antigens. |
| Bovine Serum Albumin | Moderate | High | Contains tyrosine phosphorylations, filter before use to reduce background noise. |
| Fish Gelatin | Low | Low | Does not cross-react with mammalian antibodies, avoid with avidin-biotin systems. |
| Normal Serum | Moderate | Moderate | Use from the same species as secondary antibody, avoid same species as primary antibody. |
| Proprietary Buffers | Low | Low | Contains pure fractions without common contaminants, efficient for high-quality results. |
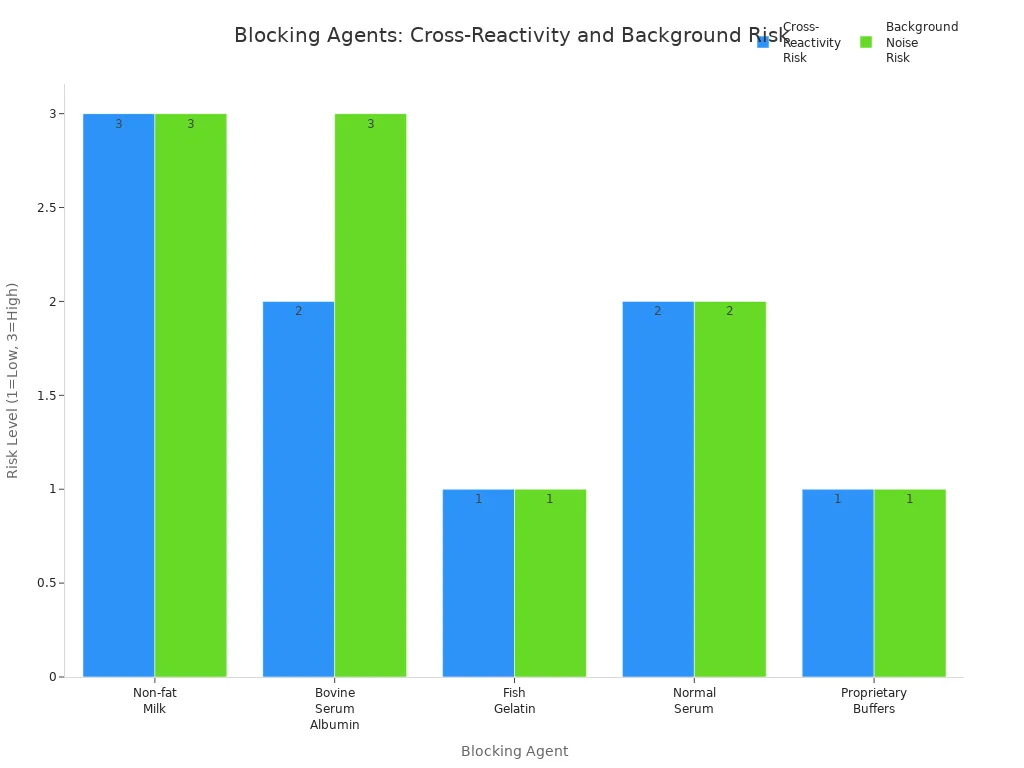
- Choose a blocking agent that matches your antibody and experiment.
- Fish gelatin and proprietary buffers have the lowest risk of cross-reactivity and background noise.
- Test different blocking agents if you see high background.
Sample Preparation
Protein Amount Optimization
You need to prepare your samples carefully to get clear results. If you use too much protein, your blot may look dark and uneven. If you use too little, you may not see your target bands. Optimizing the amount of protein helps you detect low abundant proteins and improves the accuracy of your results.
Tip: Measure protein concentration before loading your samples. This step helps you load equal amounts in each lane.
Follow these steps for better protein detection:
- Isolate your sample. You can use cells, tissues, or organelles.
- Lyse your sample with a buffer. Agitate the mixture to release proteins.
- Measure the protein concentration. Use a reliable method to check the amount.
- Reduce and denature proteins. Add agents to break down structures and make proteins linear.
You should use minimal lysis buffer to concentrate your samples. This increases the chance of detecting low abundant proteins. Make sure you optimize each step, from sample preparation to immunoblotting, for the best results.
| Step | Purpose |
|---|---|
| Sample isolation | Get the right source |
| Lysis | Release proteins |
| Measurement | Ensure equal loading |
| Reduction/Denature | Prepare proteins for separation |
Reducing Contaminants
Contaminants in your samples can cause a blotchy western blot. You need to keep your samples clean to avoid patchy backgrounds. Always wash your samples well and keep the blot immersed so it does not dry out.
- Never reuse blocking solutions. Old solutions can carry bacteria or other contaminants.
- Prepare fresh buffers with detergent and milk. This prevents bacterial growth.
- Use pure protein as a blocking agent if possible.
- Increase the concentration and duration of the blocking step to reduce background noise.
- Optimize antibody concentrations to avoid excessive background.
Note: Contamination from laboratory sources can ruin your results. Clean your tools and containers before use.
If you follow these steps, you will reduce the risk of blotchy backgrounds and improve the quality of your western blot.
Membrane Handling
Proper Wetting
You need to keep your membrane wet from the start. If the membrane dries out, you risk uneven protein transfer. This can lead to a blotchy western blot. Always soak the membrane in the right buffer before you begin. For nitrocellulose, use transfer buffer. For PVDF, dip the membrane in methanol first, then transfer buffer.
Tip: Use enough buffer to cover the membrane completely. Agitate gently to make sure every part gets wet.
You should keep the membrane submerged during all steps. If you store the membrane for a short time, keep it wet in transfer buffer at 2°C to 8°C. For long-term storage, air dry the membrane and vacuum seal it. This keeps the membrane safe from damage and contamination.
| Storage Type | Method | Temperature |
|---|---|---|
| Short-term | Wet in transfer buffer | 2°C to 8°C |
| Long-term | Air dry and vacuum seal | Room temperature |
Avoiding Damage and Bubbles
Handle membranes with care. You should always wear clean gloves and use clean forceps. Dirty tools can leave marks or introduce contaminants. These marks may show up as spots or streaks on your blot.
Note: Never touch the membrane with your fingers. Oils and dirt can cause problems during detection.
When you set up the transfer, make sure no air bubbles get trapped between the gel and membrane. Air bubbles block protein movement and create blank spots. Use a roller or glass rod to smooth out the membrane. Keep the membrane wet and use enough buffer to prevent bubbles.
- Handle membranes gently to avoid tears or folds.
- Remove air bubbles before starting the transfer.
- Always use clean tools and containers.
If you follow these steps, you will reduce the risk of damage and get clearer results.
Blocking and Washing
Choosing Blocking Agents
You need to pick the right blocking agent to prevent unwanted signals on your membrane. Blocking agents fill empty spaces on the membrane so antibodies do not stick where they should not. If you use the wrong blocker, you may see high background or even a blotchy western blot.
Common blocking agents include:
- Non-fat dry milk: Works well for many antibodies. It is affordable and easy to use.
- Bovine serum albumin (BSA): Good for phospho-proteins. It does not contain casein, which can interfere with some antibodies.
- Fish gelatin: Useful if you want to avoid mammalian proteins.
- Commercial proprietary buffers: These are ready to use and often give low background.
Tip: Test different blockers if you see high background. Some antibodies work better with BSA, while others prefer milk.
You should always filter your blocking solution to remove particles. Use fresh blocking buffer each time to avoid contamination.
| Blocking Agent | Best For | Caution |
|---|---|---|
| Non-fat dry milk | General use | Not for phospho-antibodies |
| BSA | Phospho-proteins | Filter before use |
| Fish gelatin | Avoiding mammalian | Not for avidin-biotin systems |
| Proprietary buffers | High-quality results | Cost may be higher |
Washing Techniques
Washing removes unbound antibodies and reduces background noise. You need to wash your membrane well after each antibody step. Poor washing can leave behind extra antibody, which causes streaks or spots.
Follow these steps for effective washing:
- Use a large volume of wash buffer. For a standard blot, use at least 40 ml.
- Wash for 5–10 minutes each time. Repeat this step three to five times.
- Gently shake the membrane during washing. This helps remove unbound antibody.
- Use a buffer with Tween-20. This detergent helps wash away proteins that do not bind specifically.
Note: Always prepare fresh wash buffer. Old buffer can grow bacteria and increase background.
If you wash your membrane well, you will see clear bands and a smooth background. Good washing and blocking steps help you avoid a blotchy western blot and make your results easier to interpret.
Antibody Usage
Dilution Optimization
You need to find the right antibody dilution for your western blot. If you use too much antibody, you may see high background. If you use too little, your bands may look faint. Start by checking the datasheet for your antibody. Most companies suggest a dilution range. You can run a small test blot to compare different dilutions.
Here is a simple way to optimize your antibody dilution:
- Prepare several samples with different antibody concentrations.
- Incubate each membrane with a different dilution.
- Wash and detect the signal.
- Compare the bands and background.
| Dilution | Band Strength | Background |
|---|---|---|
| 1:500 | Strong | High |
| 1:2,000 | Clear | Low |
| 1:10,000 | Weak | Very Low |
Tip: Use the lowest dilution that gives you clear bands and minimal background. This saves antibody and improves your results.
Preventing Non-Specific Binding
Non-specific binding can make your blot look messy. You may see extra bands or a blotchy western blot. To prevent this, you need to block the membrane well and wash it carefully. Choose a blocking agent that matches your antibody. Milk works for many antibodies, but BSA is better for phospho-proteins.
You should also filter your antibody solution before use. This removes particles that can stick to the membrane. Always wash the membrane after each antibody step. Use a buffer with Tween-20 to help remove unbound antibody.
Note: Centrifuge your secondary antibody before use. This step helps remove aggregates that cause speckles.
If you follow these steps, you will see clear bands and a smooth background. Good antibody handling helps you get reliable results every time.
Transfer Optimization
Transfer Time and Buffer
You need to set the right transfer time and choose the correct buffer for your western blot. If you transfer proteins for too short a time, you may see weak bands. If you transfer for too long, you risk losing small proteins or getting a smeared background. Most scientists recommend transferring for 1 to 2 hours at 100 volts for standard gels. For smaller proteins, you can use 30 to 60 minutes. For larger proteins, you may need up to 2 hours.
You should use a buffer that matches your membrane and protein size. The most common buffer is Tris-Glycine with 20% methanol. Methanol helps proteins bind to the membrane. For PVDF membranes, you need methanol. For nitrocellulose, you can use less methanol. If you use too much methanol, large proteins may not transfer well.
Tip: Always check your buffer recipe before starting. Fresh buffer gives you better results and reduces background.
Here is a simple table to help you choose:
| Protein Size | Transfer Time | Methanol (%) | Membrane Type |
|---|---|---|---|
| Small (<30 kDa) | 30–60 min | 20 | PVDF/Nitrocellulose |
| Medium (30–100 kDa) | 1–2 hr | 20 | PVDF/Nitrocellulose |
| Large (>100 kDa) | 2 hr | 10 | PVDF/Nitrocellulose |
Preventing Overheating
You must prevent overheating during the transfer step. High temperatures can damage proteins and cause a blotchy western blot. Heat can also dry out the membrane and create uneven bands. To keep the temperature low, use a cooling unit or place your transfer system in a cold room. You can add ice packs to the buffer tank. Some labs use a buffer with lower ionic strength to reduce heat.
Note: Check the temperature every 30 minutes. If the buffer feels warm, add more ice or lower the voltage.
You should never let the buffer run dry. Always use enough buffer to cover the membrane and gel. If you see bubbles or steam, stop the transfer and cool the system. Careful temperature control helps you get clear bands and a smooth background.
Equipment and Reagents
Cleanliness
You need to keep your equipment and workspace clean to get clear western blot results. Dirty tools or containers can leave marks or spots on your membrane. These marks can look like extra bands or blotches. Always wash your forceps, trays, and beakers before you start. Use detergent and rinse with distilled water. Dry your tools with a clean paper towel or let them air dry.
Tip: Wear gloves when you handle membranes. Oils from your skin can cause unwanted spots.
Check your workspace for dust or spills. Wipe down benches before you set up your experiment. If you use reusable containers, clean them after every use. This simple habit helps you avoid contamination and keeps your results reliable.
| Tool/Area | Cleaning Method | How Often |
|---|---|---|
| Forceps | Detergent + water rinse | Before each use |
| Trays/Containers | Detergent + water rinse | After each use |
| Benchtop | Wipe with damp cloth | Daily |
Fresh Buffers
You should always prepare fresh buffers for each western blot. Old buffers can grow bacteria or lose their strength. This can lead to weak signals or a blotchy western blot. Measure your chemicals carefully and mix them well. Use clean bottles and stir with clean rods or magnetic stir bars.
If you store buffers, label them with the date. Throw away any buffer that looks cloudy or has particles. Never reuse blocking or washing solutions from a previous experiment. Fresh buffers help you get sharp bands and a smooth background.
- Make new buffer before each experiment.
- Use distilled or deionized water.
- Store buffers in clean, closed bottles.
Note: Fresh solutions give you the best chance for clear, accurate results.
Troubleshooting Checklist
Quick Reference Steps
Use this checklist to quickly spot and fix the most common problems that cause a blotchy western blot:
- 🧪 Check Membrane Wetting: Make sure the membrane stays wet at all times. Dry spots can block protein transfer.
- 🧼 Clean Tools and Containers: Always use clean forceps and trays. Dirty equipment can leave marks or spots.
- 🧊 Control Temperature: Keep the transfer cool. Overheating can damage proteins and create uneven bands.
- 🧴 Prepare Fresh Buffers: Mix new buffers for each experiment. Old buffers may grow bacteria or lose strength.
- 🧫 Optimize Protein Amount: Measure protein concentration before loading. Too much protein can cause high background and multiple bands. Too little may require long exposure times to see faint bands.
- 🧹 Wash Thoroughly: Wash the membrane well after each antibody step. Use enough buffer and shake gently.
- 🧪 Adjust Antibody Dilution: Test different dilutions to find the best signal with the lowest background.
- 🧬 Use Protease Inhibitors: Add inhibitors to your samples to prevent protein degradation. For example, β-Catenin signal fades quickly without them.
Tip: Print this checklist and keep it near your bench for every western blot.
Systematic Problem Solving
When you see a blotchy western blot, follow these steps to find and fix the problem:
- Review Sample Preparation: Did you use protease inhibitors? Did you measure protein concentration?
- Inspect Membrane Handling: Was the membrane always wet? Did you remove all air bubbles?
- Check Blocking and Washing: Did you use the right blocking agent? Did you wash enough times?
- Evaluate Antibody Steps: Did you optimize antibody dilution? Did you filter or centrifuge the antibody?
- Assess Transfer Conditions: Was the transfer time and buffer correct? Did you keep the system cool?
- Confirm Equipment Cleanliness: Were all tools and containers clean and free from residue?
- Repeat with Adjustments: Change one variable at a time. Record what you changed and the results.
Note: A systematic checklist helps you find the cause faster and improves your results over time.
You can prevent a blotchy western blot by following a few key steps.
- Optimize blocking time and buffer to reduce unwanted signals.
- Wash membranes well between steps to remove extra antibodies.
- Filter antibody solutions before use and handle membranes gently.
- Use enough buffer and always check for bubbles.
- Clean your equipment and keep your workspace tidy.
Keep a troubleshooting log to track what works best. This habit helps you get clear, reliable results every time.
FAQ
What causes white spots on my western blot?
White spots often appear when the membrane dries out or air bubbles get trapped during transfer. You can prevent these by keeping the membrane wet and carefully removing bubbles with a roller before starting the transfer.
How do I know if my antibody concentration is too high?
If you see a dark, blotchy background or extra bands, your antibody concentration may be too high. Try using a higher dilution. You can test several dilutions to find the one that gives clear bands with low background.
Can I reuse blocking or washing buffers?
You should not reuse blocking or washing buffers. Old solutions can grow bacteria or lose effectiveness. Always prepare fresh buffers for each experiment. This helps you avoid contamination and keeps your results reliable.
Why do I see streaks instead of clear bands?
Streaks often mean you loaded too much protein or did not wash the membrane enough. Try loading less protein and increase your washing steps. Use a shaker to help remove unbound antibodies.
What is the best way to store membranes before detection?
For short-term storage, keep the membrane wet in transfer buffer at 2°C to 8°C. For long-term storage, air dry the membrane and vacuum seal it. Always handle membranes with clean gloves and forceps.