News & Events
Best Practices for Plasmid DNA Concentration in Sanger Sequencing

Sep
You need to use a plasmid DNA concentration between 45 and 100 ng/µl for optimal sanger sequencing results. Keeping your sanger sequencing plasmid concentration within this range helps you avoid problems that can cause sequencing to fail.
- Too much DNA can overwhelm the reaction.
- Too little DNA often leads to weak or unreadable data.
- Direct sequencing usually fails if the concentration is not right.
Accurate measurement matters for every sample. Troubleshooting common issues starts with getting the concentration correct.
Key Takeaways
- Maintain plasmid DNA concentration between 45 and 100 ng/µl for optimal Sanger sequencing results.
- Use the ‘divide by 20 rule’ to estimate the minimum DNA concentration needed based on plasmid size.
- Check the purity of your DNA with an A260/A280 ratio around 1.8 to ensure high-quality sequencing.
- Submit at least 10 µl of plasmid DNA at the recommended concentration to avoid sequencing failures.
- Always verify your sequencing provider’s specific requirements for plasmid DNA concentration and volume.
Sanger Sequencing Plasmid Concentration
Recommended Ranges
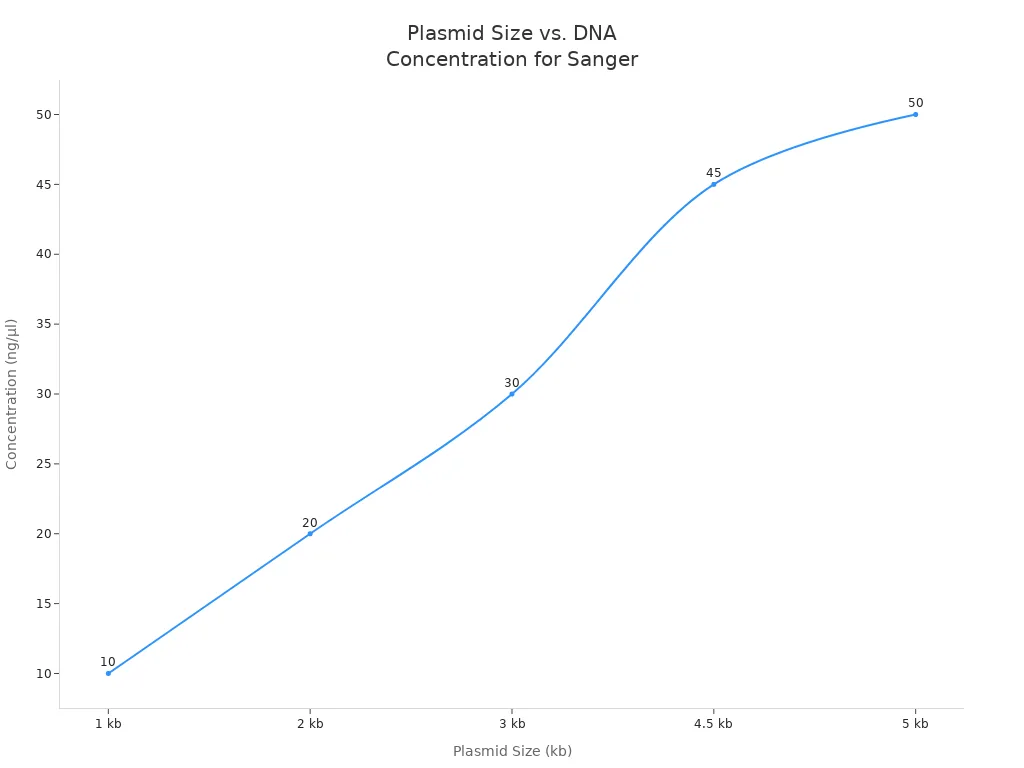
You need to pay close attention to sanger sequencing plasmid concentration before you submit your samples. Most sequencing service providers recommend a concentration between 45 ng/µl and 100 ng/µl. The exact amount depends on the size of your plasmid. For example, smaller plasmids (around 1-5 kb) require less DNA, while larger plasmids need more.
Here is a table showing the recommended sanger sequencing plasmid concentration for different plasmid sizes:
| Plasmid Size (kb) | Recommended Concentration (ng/µl) |
|---|---|
| 1 | 10 |
| 2 | 20 |
| 3 | 30 |
| 4.5 | 45 |
| 5 | 50 |
If your plasmid is larger than 10 kb, you should increase the concentration. Some providers, like CD Genomics, ask for 100 ng/µl for plasmids under 10 kb and up to 500 ng/µl for those over 10 kb. Poochon Scientific recommends at least 50 ng/µl for most plasmids and 100 ng/µl for those above 15 kb.
| Provider | Sample Type | Concentration Requirement |
|---|---|---|
| Poochon Scientific | Purified plasmid DNA | ≥ 50 ng/µl (≥100 ng/µl for ≥15 kb) |
| CD Genomics | Purified Plasmid (<10 kb) | ≥ 100 ng/μL |
| Purified Plasmid (>10 kb) | ≥ 500 ng/μL |
You can use the “divide by 20 rule” to estimate the amount of DNA you need. Take the size of your plasmid in kilobases and divide by 20. This gives you the minimum concentration in ng/µl. For example, a 4 kb plasmid needs at least 20 ng/µl (4 ÷ 20 = 0.2, then multiply by 100 for ng/µl).
Tip: Always check the requirements of your sequencing provider. Some labs have stricter rules for sanger sequencing plasmid concentration, especially for large plasmids.
Submission Volumes
You must also prepare the right volume for submission. Most commercial sequencing services ask for at least 10 µl of plasmid DNA at the recommended concentration. This ensures you provide enough DNA for the reaction and a backup if needed.
| Type | Size | Concentration | Volume | Total Mass | | double-stranded Plasmid | < 5 kb | ~50 ng/µl | 10 µl | ~0.5 µg | | double-stranded Plasmid | 5-10 kb | ~75 ng/µl | 10 µl | ~0.75 µg | | double-stranded Plasmid | > 10 kb | ~100 ng/µl | 10 µl | ~1 µg |
- You should submit at least 10 µl of DNA.
- Add 1 µl of primer (5–10 µM stock) to your sample.
- Use water to bring the total volume to 12 µl if needed.
Some facilities accept a minimum DNA concentration of 30 ng/µl, but you should aim for the recommended range to avoid failed sequencing. The standard DNA requirement is 200 ng for most plasmids. For plasmids larger than 20 kb, you may need up to 400 ng.
Note: Always measure your DNA concentration before submission. If you send too little or too much, you risk poor results or wasted samples.
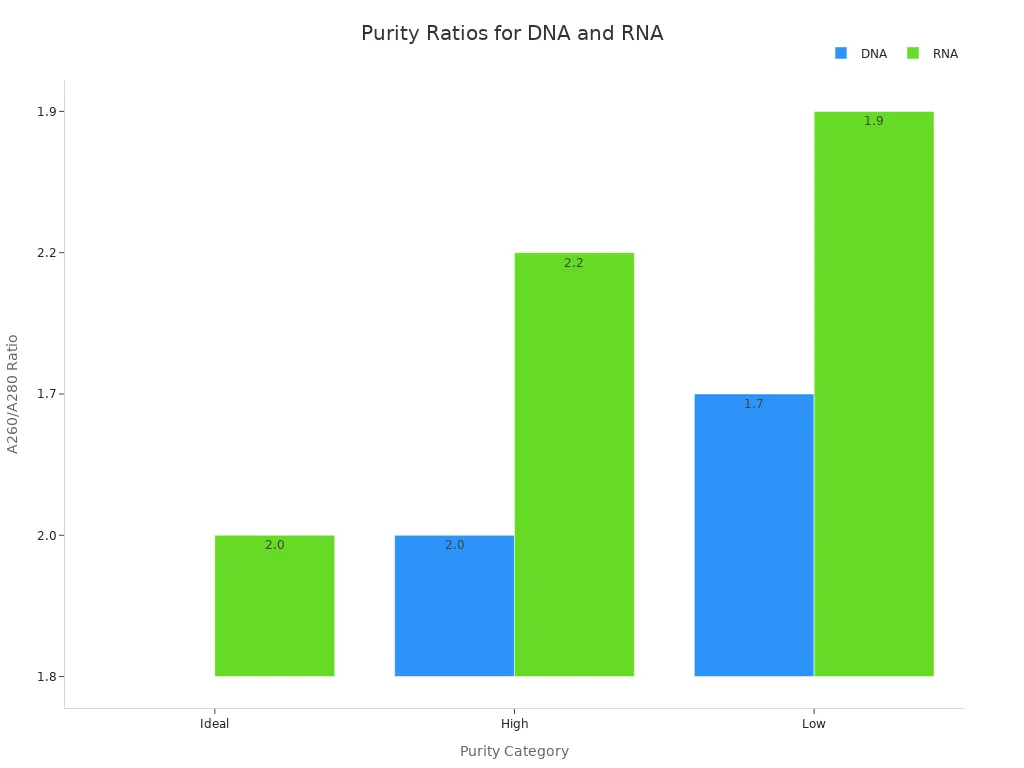
You must also check the purity of your plasmid DNA. The ideal A260/A280 ratio is about 1.8 for DNA. Ratios below 1.7 or above 2.0 can signal contamination or poor quality.
| Sample Type | Ideal | High | Low |
|---|---|---|---|
| DNA | ~1.8 | >2.0 | <1.7 |
| RNA | ~2.0 | >2.2 | <1.9 |
You should always keep your sanger sequencing plasmid concentration within the recommended range and check purity before sending your samples. This helps you get clear, reliable sequencing data every time.
Why Concentration Matters
Sequencing Quality
You need the right plasmid DNA concentration to get high-quality Sanger sequencing results. If you use DNA at 100 ng/μl, you can expect up to 1400 base pairs of clear, readable data. When you keep your samples pure and free from contaminants, you help the sequencing reaction work smoothly. Contamination during plasmid DNA isolation can lower the quality of your results. You should always check your DNA purity before submission. A ratio of 1.8 for A260/A280 means your sample is clean and ready for sequencing.
| Plasmid DNA Concentration | Sequencing Quality Data |
|---|---|
| 100 ng/μl | Up to 1400bp of good quality data |
High-quality and pure DNA samples are essential for optimal sequencing results. If you use improper quantification methods, such as relying only on a Nanodrop, you might get inaccurate readings. This can lead to poor sequencing outcomes.
Tip: Always use reliable methods to measure DNA concentration, like fluorometry or spectrophotometry, to avoid errors.
Common Issues
You may face several problems if your plasmid DNA concentration falls outside the recommended range. Here are some common issues:
- Failed Sequencing Reactions
You might see mostly N’s in your sequence data. Low template concentration is the most frequent cause. You should keep your DNA between 100 ng/μl and 200 ng/μl. - Poor Quality DNA
If your DNA is not pure, the sequencing reaction may not work. Aim for a 260/280 ratio of 1.8 or higher. - Excessive DNA
Too much DNA can stop the reaction. Always follow the guidelines for concentration. - Bad or Incorrect Primer
Make sure your primer is high quality and matches your target sequence. - Blocked Capillary
This is rare, but it can happen in about 1 out of 200 reactions.
| Consequence | Description |
|---|---|
| Sequencing failures | Submitting samples outside the recommended concentration can lead to failures. |
| Low-quality results | Inadequate DNA concentration results in poor sequencing data. |
| Improper quantification | Using unreliable methods can worsen these problems. |
You can avoid most issues by preparing your samples carefully and following the recommended concentration guidelines. This helps you get reliable and accurate sequencing results every time.
Calculating DNA Amounts

Divide by 20 Rule
You can quickly estimate the right amount of plasmid DNA for Sanger sequencing by using the “divide by 20 rule.” This rule helps you find the minimum DNA concentration you need based on your plasmid size. Take the size of your plasmid in kilobases (kb), divide it by 20, and then multiply by 100 to get the recommended concentration in ng/µl.
For example:
- If your plasmid is 4 kb, divide 4 by 20. You get 0.2. Multiply 0.2 by 100. You need at least 20 ng/µl.
- If your plasmid is 10 kb, divide 10 by 20. You get 0.5. Multiply 0.5 by 100. You need at least 50 ng/µl.
Tip: The “divide by 20 rule” gives you a fast way to check if your DNA concentration is high enough for sequencing. Always round up to the nearest 10 ng/µl for best results.
You can also use this simple formula:
Recommended DNA (ng/µl) = (Plasmid size in kb ÷ 20) × 100
This rule works well for most standard plasmids. For very large plasmids, you may need to use higher concentrations. Always check your sequencing provider’s guidelines.
Plasmid Size Table
You should match your plasmid size to the right DNA amount for the best sequencing results. The tables below show the recommended DNA amounts for different plasmid sizes and types. These values come from published guidelines and service provider recommendations.
| Plasmid Size (kb) | Recommended DNA Amount (ng/µl) |
|---|---|
| 1 | 10 |
| 2 | 20 |
| 3 | 30 |
| 4.5 | 45 |
| 5 | 50 |
| 10 | 100 |
| 15 | 150 |
You can also see how the recommended DNA amount changes with different template sizes:
| Template Size (bp) | Recommended Amount of Plasmid DNA (ng) | Primer Amount |
|---|---|---|
| 3,000 to 5,000 | 150 to 250 | 2 picomoles (1 μl of 2 μM primer) |
| 5,000 to 10,000 | 250 to 500 | 10 picomoles (1 μl of 10 μM primer) |
| BACs, Cosmids, Fosmids | Up to 1,000 | 20 picomoles (1 μl of 20 μM primer) |
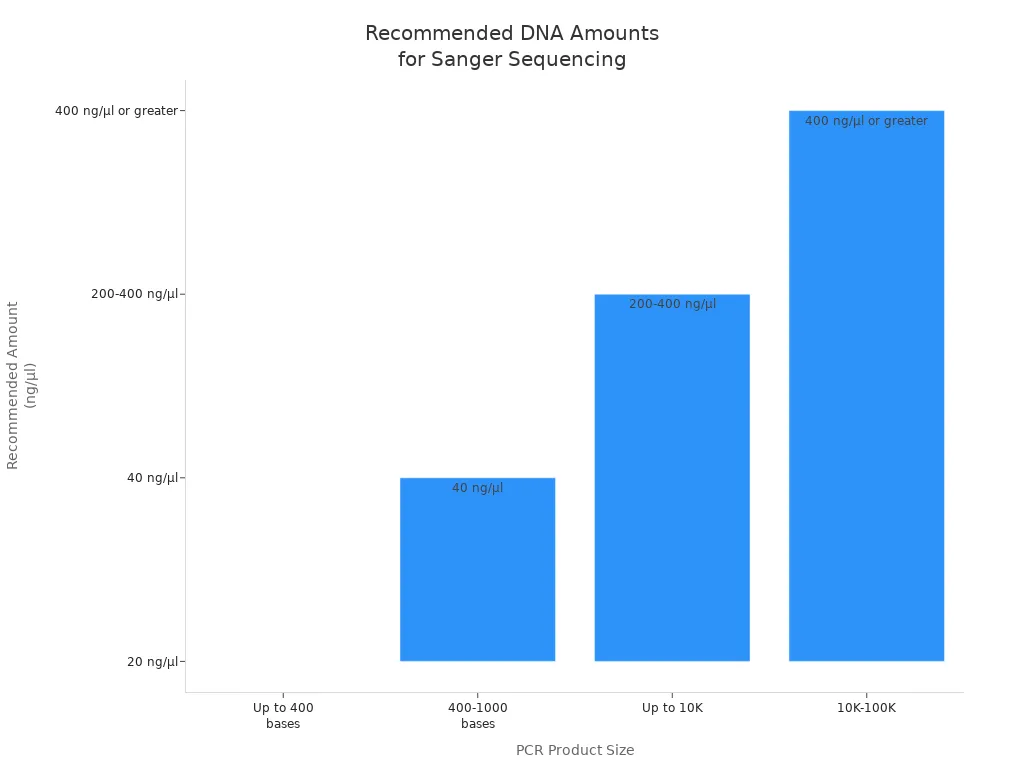
For PCR products and other DNA types, the recommended amounts look like this:
| PCR Product Size | Recommended Amount (ng/µl) |
|---|---|
| Up to 400 bases | 20 |
| 400–1,000 bases | 40 |
| Up to 10,000 bases | 200–400 |
| 10,000–100,000 | 400 or greater |
You can also check the recommended amounts for different plasmid types:
| Plasmid Type | Recommended Amount |
|---|---|
| Full PlasmidSeq | 20 ng/µl |
| BacterialSeq | 50 ng/µl |
| Single Stranded DNA | 0.5 µg per kb |
| Double Stranded DNA | 1 µg per kb |
Note: Always measure your DNA before you send your sample. Use the tables above to make sure your plasmid DNA meets the requirements for your sequencing reaction. This helps you avoid failed runs and wasted time.
By following these tables and using the “divide by 20 rule,” you can prepare your plasmid DNA with confidence. You will get better sequencing results and fewer problems with your samples.
Sample Preparation
Measurement Methods
You need to measure your plasmid DNA concentration before Sanger sequencing. You can use several methods to check both the amount and purity of your DNA:
- Spectrophotometry (like Nanodrop): This tool measures DNA concentration and purity. You should look for an A260/A280 ratio between 1.8 and 2.0.
- Qubit DNA Assay: This method gives you a precise DNA concentration, even if your sample has contaminants.
- Gel Electrophoresis: You can use this to see if your DNA is intact and pure by checking the bands on the gel.
Tip: Always use more than one method if you want the most accurate results.
Preparation Steps
You should follow a clear process to prepare your plasmid DNA samples for sequencing. Here is a step-by-step guide:
- Log your samples into the sequencing provider’s submission site.
- Label each tube with the correct barcode.
- Add the optimal amount of template DNA to each tube.
- Place all tubes in a zip lock bag.
- Deliver your package to the mailroom or drop-off point before the deadline.
You should use spin column purification for high-purity DNA. Ethanol precipitation can also work, but you may need RNase treatment to remove RNA. Always elute your DNA in TE buffer to keep it stable.
Purity Checks
You must check the purity of your DNA before sending it for sequencing. Look for an A260/A280 ratio close to 1.8. If your ratio is below 1.7 or above 2.0, your sample may have contaminants. Avoid common mistakes like using only Nanodrop without checking with another method, or eluting DNA in water instead of TE buffer. Contaminants like ethanol or EDTA can cause sequencing to fail.
| Factor | Impact on Stability |
|---|---|
| pH | Extreme pH can break DNA and lower stability. |
| DNase contamination | DNase can degrade DNA and cause fragmentation. |
| Elution buffer choice | TE buffer keeps DNA stable and protects it from damage. |
Note: Always store your DNA at the right pH and use TE buffer to protect your samples.
Troubleshooting
Failed Sequencing
You may sometimes see failed Sanger sequencing reactions. Several common problems can cause this.
- Poor quality template DNA often leads to failure. Residual ethanol or salt from the purification process can interfere with the reaction.
- Using too little template DNA means you might not have enough material for the sequencing to work. Most reactions need 1,000–1,500 ng of DNA.
- Too much template DNA can also cause problems. The reaction may not produce enough labeled fragments if you overload the sample.
- If you do not remove all SDS detergent during miniprep, your DNA quality drops. This can stop the sequencing reaction.
Always check your DNA for purity and concentration before you start. Clean DNA gives you the best chance for success.
Adjusting Concentration
If your plasmid DNA concentration is not within the recommended range, you can fix it. Use the table below to guide your next steps:
| Issue | Corrective Action |
|---|---|
| Too Much DNA | Dilute Samples |
| Too Little DNA | Increase Template Concentration |
You can dilute your sample with TE buffer or nuclease-free water if the concentration is too high. If the concentration is too low, you may need to concentrate your DNA by ethanol precipitation or repeat your extraction. Always re-measure your DNA after making adjustments.
Quality Issues
Quality problems can also cause sequencing to fail. Contaminants like ethanol, salt, or leftover detergent can block the reaction. You should always check the A260/A280 ratio. Aim for a value close to 1.8 for DNA. If you see a lower or higher ratio, clean your sample again.
When preparing your template and primer for plasmid dna, make sure both are pure and at the right concentration. This helps the sequencing reaction work as expected.
Tip: Use both spectrophotometry and fluorometry to check your DNA. This gives you a more accurate measurement and helps you avoid surprises.
You can achieve reliable Sanger sequencing results by following best practices for plasmid DNA concentration. Always use DNA of regular length and high purity, and keep the concentration within the recommended range. Contaminants or low-quality DNA often cause weak or unusable data. Before you submit your samples, check this quick checklist:
| Item | Requirement |
|---|---|
| Plasmid DNA | 5 µl per reaction at 100 ng/µl |
| Primers | 5 µl per reaction at 3.2 pmol/µl |
| Submission | Tubes or plates |
Consult the tables and guidelines in this article to prepare your samples with confidence.
FAQ
What is the ideal plasmid DNA concentration for Sanger sequencing?
You should use plasmid DNA at 45–100 ng/µl. This range works for most plasmid sizes. For plasmids larger than 10 kb, increase the concentration to 100–500 ng/µl. Always check your sequencing provider’s guidelines.
How do you measure plasmid DNA concentration accurately?
You can use a spectrophotometer like Nanodrop for quick checks. For precise results, use a Qubit fluorometer. Combine both methods for best accuracy. Look for an A260/A280 ratio near 1.8 to confirm purity.
What happens if your DNA concentration is too low or too high?
Low DNA concentration often causes weak or unreadable sequencing data. High concentration can overwhelm the reaction and lead to failed runs. You should always adjust your sample to the recommended range before submission.
How much plasmid DNA should you submit for one sequencing reaction?
You need to submit at least 10 µl of plasmid DNA at the recommended concentration. Most providers require 200–400 ng total DNA per reaction. Add 1 µl of primer (5–10 µM) for best results.
Tip: Always check your provider’s requirements before sending samples.