News & Events
Mastering Serological Pipette Techniques for Immunoprecipitation

Sep
You want your immunoprecipitation results to be reliable every time. The way you use a serological pipette can make or break your experiment. Good liquid handling technique helps you avoid errors and get consistent data. Every step with the pipette matters for accuracy.
Key Takeaways
- Choose the right serological pipette based on the volume you need to transfer. Use smaller pipettes for 1-2 ml, mid-range for 5-10 ml, and larger ones for 25 ml.
- Always calibrate your pipette before starting your experiment. This ensures accurate measurements and reliable results.
- Use gentle pipetting techniques to avoid air bubbles and sample loss. Keep the pipette tip just below the liquid surface for best results.
- Follow strict cleaning protocols for your pipettes to prevent contamination. Use fresh tips for each transfer to maintain sample integrity.
- Practice your pipetting skills regularly. This helps improve your technique and ensures consistent results in your experiments.
Serological Pipette Basics

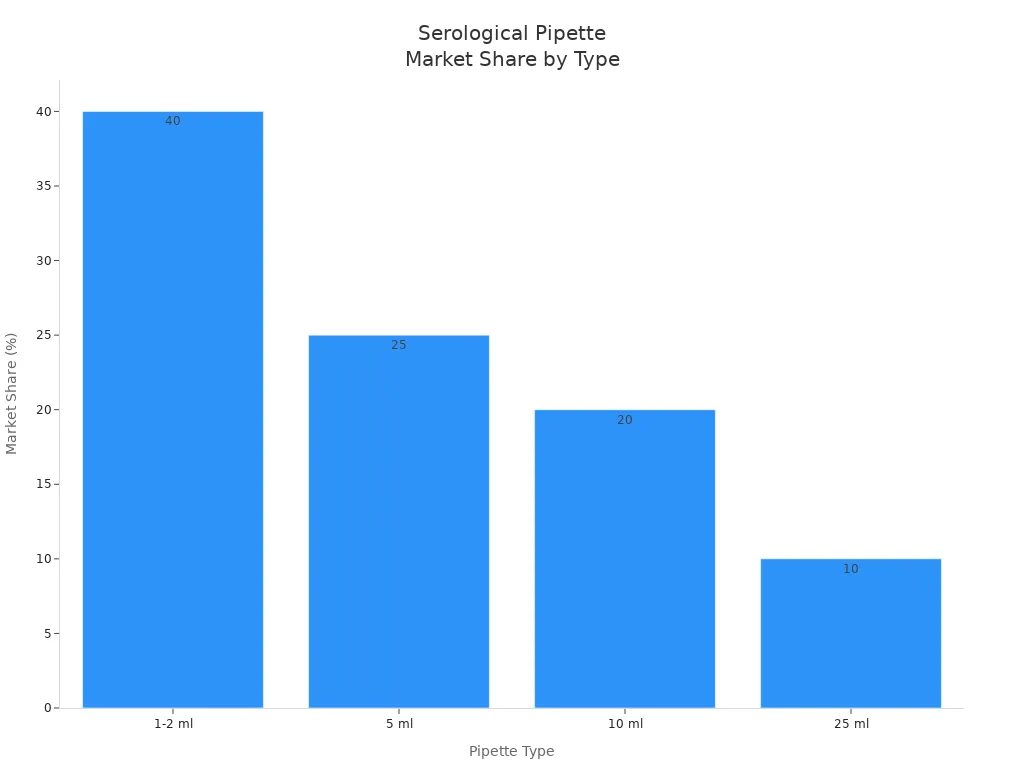
Types and Volumes
You use a serological pipette to measure and transfer liquids in many lab tasks. Each pipette type fits a specific volume range and application. You often see 1-2 ml pipettes in molecular biology and pharmaceutical research. These pipettes help you handle small volumes with high precision. You reach for a 5 ml pipette when you need to move mid-range volumes, such as in cell culture or microbiology. For larger tasks, you pick a 10 ml pipette, which works well in biotechnology and drug discovery. If you need to transfer even more liquid, a 25 ml pipette is best for industrial applications.
Here is a table that shows the most common types and their uses:
| Pipette Type | Market Share | Common Applications |
|---|---|---|
| 1-2 ml | > 40% | Precision-based applications in molecular biology and pharmaceutical research |
| 5 ml | ~ 25% | Mid-range liquid handling in microbiology and cell culture experiments |
| 10 ml | > 20% | High-volume liquid handling in biotechnology, cell culture, and drug discovery |
| 25 ml | ~ 10% | Large-volume transfers in industrial applications, primarily in pharmaceuticals |
You also need to match the pipette to the volume you want to transfer. For example, you use a micropipette for volumes under 1 ml, such as adding antibody or igg to a sample. You use a serological pipette for volumes from 1 ml up to 25 ml, such as transferring media or lysis buffer.
Applications in Immunoprecipitation
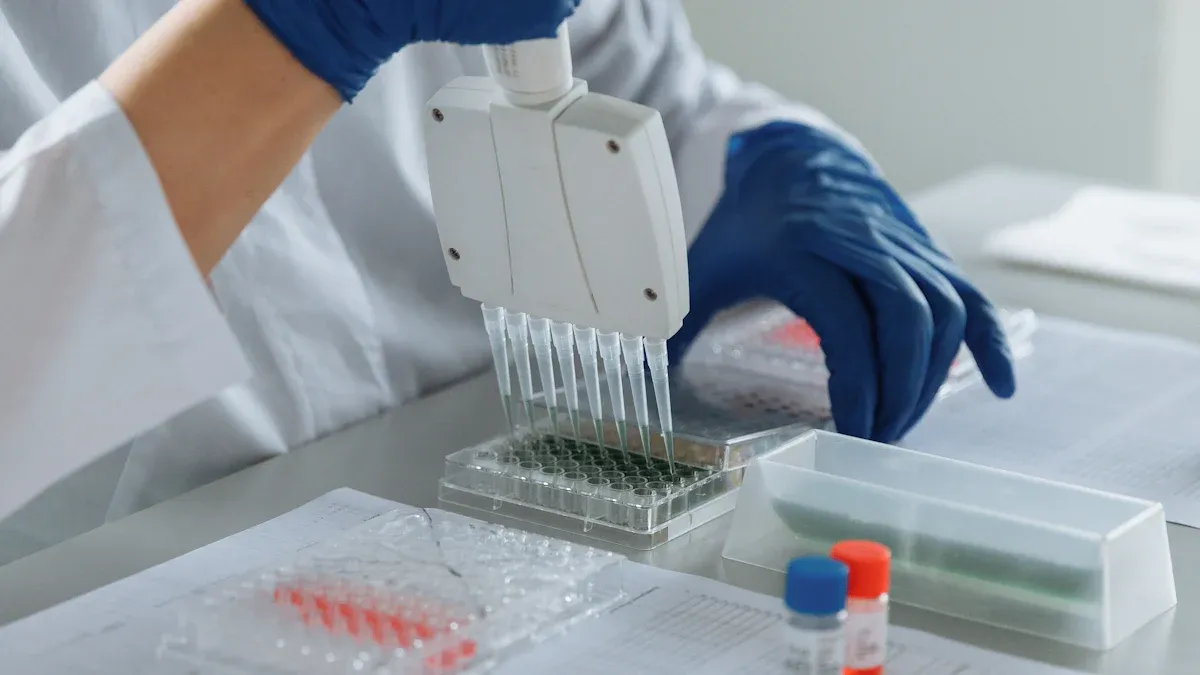
You rely on a serological pipette during immunoprecipitation to add buffer, transfer cell culture media, and mix reagents. You need precise liquid handling to keep your binding reactions consistent. When you add antibody or igg to your sample, you use the right pipette to avoid errors. You also use a serological pipette to wash your target protein and remove unwanted material. Compatibility with immunoprecipitation depends on choosing the correct pipette for each step. You improve your results by matching the pipette to the volume and application.
Tip: Always check the calibration of your pipette before starting immunoprecipitation. This helps you avoid mistakes and keeps your results reliable.
Immunoprecipitation Workflow
Key Steps
You follow a series of steps to complete an immunoprecipitation experiment. Each step needs careful attention to detail. You keep your samples on ice or at 4ºC. This slows down proteolysis and protects your target protein. You place your tubes on ice during every pipetting step. You incubate samples on ice for 30 minutes. This helps maintain sample integrity.
You use forward pipetting for standard aqueous solutions. You switch to reverse pipetting when you handle viscous liquids, such as antibody mixtures. You pause for 2-5 seconds after you aspirate liquid. This ensures you transfer the correct volume. You hold the pipette vertically for high accuracy. You insert the pipette tip just below the surface of the buffer. This prevents you from drawing in air or extra liquid. You calibrate your pipettes regularly. This keeps your results consistent.
Tip: Always chill your reagents before you start. Let your pipette and tips reach room temperature before you use them. Consistent temperature handling supports every step of your immunoprecipitation workflow.
Role of Liquid Handling
You rely on precise liquid handling to study protein-protein interactions and binding events. The way you use your serological pipette affects every part of your co-ip experiment. You need accuracy when you add buffer, transfer antibody, or wash your target protein. Good technique helps you avoid sample loss and contamination.
You can choose manual or automated systems for liquid handling. Automated systems offer several benefits:
| Benefit | Description |
|---|---|
| Consistency and Reproducibility | Automation reduces human error and variability. |
| Throughput | Automated systems can process multiple samples simultaneously, increasing efficiency. |
| Reduced Contamination Risk | Minimized manual handling reduces the chances of sample contamination. |
| Optimized Protocols | Automated systems often come with optimized protocols, ensuring the best possible results. |
You improve your immunoprecipitation results by following best practices for pipetting. You keep your workflow efficient and your data reliable.
Immunoprecipitation Pipetting Techniques
Aspiration and Dispensing Rate
You need to control the speed when you use a pipette for immunoprecipitation. Fast aspiration can cause air bubbles and lead to inaccurate measurements. Slow dispensing helps you avoid splashing and keeps your sample safe. You should always keep the pipette tip just below the surface of the buffer. This helps you draw up the liquid without pulling in air. You get better results when you pause for a moment after you aspirate. This lets the liquid settle and ensures you transfer the full volume.
Tip: Practice steady hand movements with your pipette. You improve your technique and get more reliable experiment results.
You use proper pipetting technique to keep your binding reactions consistent. You need to avoid sudden movements. You should never force the plunger. You get the best results when you use a calibrated pipette and check the volume before each transfer.
| Aspiration Rate | Recommended Use | Common Issues |
|---|---|---|
| Fast | Not recommended | Air bubbles, sample loss |
| Moderate | Best practice | Accurate measurements |
| Slow | For viscous liquids | Prevents splashing |
Preventing Sample Loss
You protect your sample by using the right pipette and handling it carefully. You clean your pipettes after every use to prevent contamination. You use cleaning solutions like Liquinox or Alconox. You label each pipette based on its intended use. This helps you avoid cross-contamination. You inspect your pipettes for wear, corrosion, or residue. You remove and report any damaged pipette immediately.
- Pay special attention to serological pipettes because they handle sensitive samples.
- Schedule preventative maintenance with professional services.
- Use proper technique and handling to maintain sample integrity.
You keep your target protein safe by using gentle pipetting. You avoid touching the sides of the tube with the pipette tip. You use reverse pipetting for viscous solutions like antibody mixtures or lysis buffer. You get better protein-protein interactions when you minimize sample loss.
Avoiding Contamination
You need to keep your samples clean during immunoprecipitation. You pre-clear lysates with beaded support to remove non-specific reactive components. You use a non-specific antibody of the same species and isotype as your capture antibody. This reduces background noise in your western blotting results.
- Use input control, isotype control, and bead-only control in your experiment.
- Wash your pipette tips and tools thoroughly between each step.
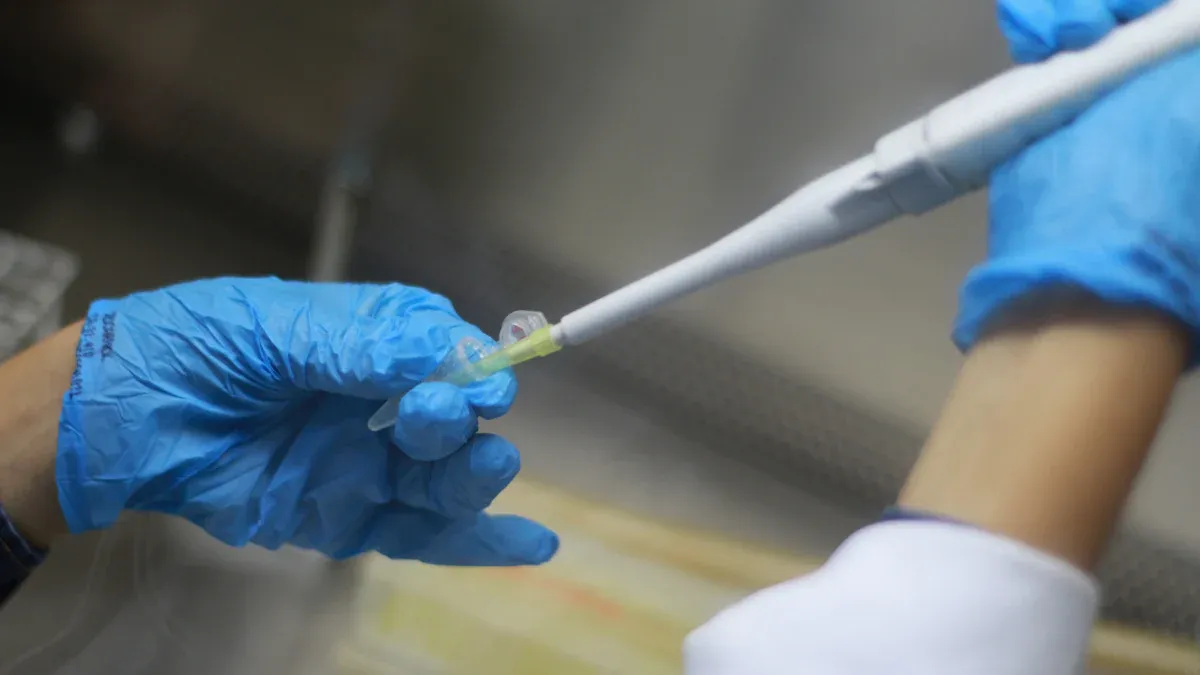
- Always use a fresh pipette tip for each transfer.
You wash your scalpel with water, then methanol, and then water again between each gel slice excision. You keep your pipette clean and dry before you use it. You avoid touching the pipette tip to any surface except the liquid you want to transfer. You get better results in western blot analysis when you follow these steps.
Note: You improve your immunoprecipitation pipetting techniques by following strict cleaning and control protocols. You protect your target protein and get accurate measurements every time.
Serological Pipette Selection and Care
Choosing the Right Pipette
You need to select the correct pipette for each step in your experiment. You look at the volume you want to transfer and the type of liquid. You use a serological pipette for larger volumes, such as transferring buffer or media. You choose a pipette with clear markings and a comfortable grip. You check that the pipette fits your hand and works with your fillers. You avoid using a pipette that feels loose or has faded markings. You get better results when you match the pipette to your sample and protocol.
Calibration and Maintenance
You keep your pipette accurate by calibrating it often. You follow the manufacturer’s instructions for calibration. You test the pipette with water and measure the volume. You record the results and adjust the pipette if needed. You clean the pipette after each use. You use a cleaning solution and rinse all parts. You dry the pipette before storing it. You inspect the pipette for damage or residue. You report any problems right away.
Tip: Always set your pipette to its minimum volume setting before storing. This helps relieve spring tension and extends its life.
Manual vs. Automated Systems
You can use manual or automated pipetting systems. Manual pipettes give you control and flexibility. You adjust the speed and angle for each transfer. You need steady hands and good technique. Automated systems offer high consistency and precision. You process many samples at once. You reduce human error and get reproducible results. You choose automated pipetting for large experiments or when you need exact measurements.
Best Practices for Cleaning and Storage
- Clean the pipette fillers after every use to prevent cross-contamination.
- Use an appropriate cleaning solution, rinse all components, and dry them thoroughly.
- Store pipettes in a designated area away from direct sunlight and extreme temperatures.
- Use a protective case to extend the lifespan of your pipette.
- Suspend pipettes vertically on specialized racks or stands.
- Store pipettes in an enclosed, dust-free cabinet for long-term storage.
- Always set the pipette to its minimum volume setting before storing.
- Keep pipettes upright to prevent liquid from entering the shaft.
- Avoid placing pipettes near heat sources or in direct sunlight.
- Ensure pipettes stay in a clean and dust-free environment.
You follow these steps to keep your serological pipette reliable and ready for every experiment.
Immunoprecipitation Troubleshooting
Low Yield
You may notice low yield in your immunoprecipitation experiment. This means you do not recover enough target protein. Several factors can cause this problem. You might use the wrong pipette or transfer the wrong volume. You may lose sample during pipetting or washing steps. You might use too little antibody or igg, or your antibody may not bind well to your target protein.
To improve yield:
- Check that you use a calibrated pipette for every transfer.
- Use the correct volume of antibody or igg for your sample size.
- Keep your samples cold to protect protein-protein interactions.
- Avoid harsh pipetting that can break up antibody-target protein complexes.
- Use a positive control to confirm your protocol works.
Tip: Always use gentle pipetting when handling your target protein. This helps keep the binding between antibody and target protein strong.
Non-Specific Binding
Non-specific binding can make your western blotting results hard to interpret. You may see extra bands on your western blot. This happens when other proteins stick to the beads or antibody, not just your target protein. Your pipette technique can help reduce this problem.
You can optimize your immunoprecipitation technique to reduce non-specific binding:
- Increase salt concentration in your buffer (up to 1 M NaCl) to make washes more stringent.
- Add reducing agents like 1-2 mM DTT or β-mercaptoethanol to minimize unwanted interactions.
- Use a more stringent washing buffer.
- Add a non-ionic detergent such as Tween-20 or Triton X-100 (0.01–0.1%) to your washing buffer.
- Block the beads before precipitation and add the same blocker to the washing buffer.
- Increase the number of washes and extend washing time.
- Decrease incubation time with beads and sample.
- Reduce the concentration of your immunoprecipitation antibody or igg.
- Pre-clear your lysate by incubating it with beads before immunoprecipitation.
- Pre-block beads with a mild blocking buffer (1-5% BSA, non-fat milk, 1% gelatin, or 0.1-1% Tween-20).
- Decrease the amount of sample loaded onto the beads if you see too much non-specific binding.
Note: Always use a fresh pipette tip for each transfer. This helps prevent cross-contamination and reduces non-specific binding.
Inconsistent Results
You may get different results each time you run your immunoprecipitation experiment. Inconsistent results often come from pipetting errors or poor technique. You might use different pipettes, or your pipette may not be calibrated. You may also use different volumes or change your pipetting speed.
To get consistent results:
- Calibrate and clean your pipette regularly.
- Use pipetting volumes of at least 5 µL for better accuracy.
- Minimize the number of pipetting steps when possible.
- Use the same pipetting technique every time. Robotic pipettors can help with consistency.
- Follow the manufacturer’s instructions for dispensing methods.
- Validate your pipetting technique by preparing a reagent cocktail and checking for reproducibility.
| Problem | Solution |
|---|---|
| Different results each time | Calibrate pipette, use consistent technique |
| Volume errors | Use larger volumes, minimize steps |
| Human error | Use robotic pipettors if possible |
Tip: Practice your pipetting technique with water before starting your immunoprecipitation. This helps you spot errors early.
Sample Handling Errors
Sample handling errors can ruin your immunoprecipitation experiment. You may lose sample by touching the pipette tip to the tube wall. You may introduce air bubbles by pipetting too quickly. You may contaminate your sample by reusing pipette tips or not cleaning your pipette.
To avoid sample handling errors:
- Always use a clean, calibrated pipette.
- Use a new pipette tip for each transfer.
- Pipette slowly and steadily to avoid bubbles.
- Keep your pipette tip just below the surface of the liquid.
- Avoid touching the sides of the tube with the pipette tip.
- Store your pipette upright and away from dust.
Remember: Careful pipette technique keeps your target protein safe and your immunoprecipitation results reliable.
Immunoprecipitation troubleshooting starts with your pipette. Good technique helps you solve problems like low yield, non-specific binding, and inconsistent results. You protect your experiment by following best practices every time.
Best Practices
Workflow Efficiency
You can improve your experiment results by following best practices for pipetting. You need to keep your workflow efficient. You should process multiple samples at the same time. This helps you save time and get consistent results. You reduce human error when you use optimized protocols. You also lower the risk of contamination by minimizing manual handling. You can see the main benefits in the table below:
| Benefit | Description |
|---|---|
| Consistency and Reproducibility | Reduces human error and variability. |
| Throughput | Processes multiple samples simultaneously, increasing efficiency. |
| Reduced Contamination Risk | Minimizes manual handling, reducing chances of sample contamination. |
| Optimized Protocols | Often comes with optimized protocols, ensuring the best possible results. |
You should adjust reagent volumes to optimize the immunoprecipitation process. Higher protein concentration leads to higher yield. You need to use specific antibody for better binding. You should allow enough time for incubation. You must use the right buffer for each step.
Training and Standardization
You need proper training to master serological pipette technique. You can join programs like Pipette Olympics to learn the basics. You can earn certifications such as Artel Pipetting Proficiency Certification. This program teaches you about pipette mechanics and technique. Sartorius Pipetting Academy helps you master advanced pipetting skills. You can also use tailored training services for your lab. These programs help you reduce errors and improve your experiment results.
| Training Program | Description |
|---|---|
| Pipette Olympics | A standardized, engaging exercise for teaching pipetting fundamentals, including serial dilutions and statistical analysis, aimed at reintroducing undergraduates to lab basics. |
| Artel Pipetting Proficiency Certification | A comprehensive training that focuses on pipette mechanics, proper technique, and ergonomic factors, culminating in a certification for participants. |
| Sartorius Pipetting Academy | A program designed to master advanced pipetting techniques and optimize tool selection for various liquids and conditions. |
| Training Services | Offers tailored on-site and online pipette training to improve user performance and reduce errors. |
Tip: You should practice with antibody and buffer solutions to improve your pipette skills before starting a real experiment.
Quick Checklist
You can follow this checklist to make sure you use best practices for pipetting in immunoprecipitation:
- Hold the pipette vertically for accurate measurement.
- Read the meniscus at eye level.
- Check for air bubbles before drawing liquid.
- Never overfill the pipette.
- Clean and sterilize after each use.
- Use a fresh pipette for each antibody or buffer.
- Calibrate pipettes regularly.
- Dispose of single-use pipettes properly.
| Checklist Item | Description |
|---|---|
| Pipette Orientation | Always hold the serological pipette vertically to maintain measurement accuracy. |
| Reading the Meniscus | Read from the bottom of the meniscus at eye level to avoid parallax errors. |
| Avoiding Air Bubbles | Ensure no air bubbles are present before drawing liquid; tap gently to remove if necessary. |
| Avoiding Overfilling | Never overfill the pipette; allow air space at the top to prevent spillage. |
| Cleaning and Sterilization | Clean after each use, especially after contact with chemicals or biological materials. |
| Avoiding Cross-Contamination | Use a fresh pipette for different reagents to prevent cross-contamination. |
| Pipette Calibration | Regularly calibrate pipettes to ensure accurate measurements. |
| Disposal | Dispose of single-use pipettes properly, especially after contact with hazardous materials. |
Remember: You get the best results when you follow these steps every time you use a pipette with antibody or buffer in your experiment.
Mastering serological pipette techniques helps you achieve reliable immunoprecipitation results. You protect your target protein and improve binding between antibody and igg when you use the right pipette and handle it with care. Regular cleaning after each experiment and prompt inspection for damage keep your pipette accurate for every western blot.
Actionable reminders for lab professionals:
- Avoid touching the sterile pipette or placing it on surfaces.
- Use the ‘Blown Out’ technique to empty the pipette fully.
- Prevent solution from entering the cotton plug.
- Always wear protective gear in the lab.
Stay focused on skill development and attention to detail. Your careful technique ensures every experiment gives you the best results.
FAQ
How do you choose the right serological pipette for immunoprecipitation?
You match the pipette to your volume. For 1–2 ml, use a small pipette. For 5–10 ml, pick a mid-size pipette. Always check the markings and calibration before you start.
What is the best way to avoid air bubbles during pipetting?
You keep the pipette tip just below the liquid surface. You move the plunger slowly. If you see bubbles, tap the tube gently to release them.
How often should you calibrate your serological pipette?
You calibrate your pipette every three months. If you use it daily, check it monthly. Record each calibration in your lab notebook for accuracy.
Can you reuse serological pipettes in immunoprecipitation?
You should not reuse single-use pipettes. You use a fresh pipette for each sample to prevent contamination. Clean reusable pipettes with approved solutions after every use.
What is the difference between manual and automated pipetting?
Manual pipetting gives you control over speed and angle. Automated pipetting offers high consistency and processes many samples at once. You choose based on your experiment size and need for precision.